
Designing for Compliance: How to Avoid Costly Deviations
Compliance problems almost never show up at a design review. They show up eight weeks before launch, in a test lab, when fixing them means a new circuit board instead of a quick edit to a drawing.
Designing for compliance simply means you treat safety, EMC, and documentation as design inputs from day one, rather than as a box you tick at the end.
In this guide I will walk you through where deviations actually come from, and what you can do at each stage to stop them. By the end you will have a phase-by-phase checklist you can take straight into your next project.
Why Does Designing for Compliance Beat Fixing Problems Later?
You have probably seen the performance-first trap in action. The team pours months into the user interface, the battery life, and the processing speed, then hands the finished product to a compliance engineer three weeks before the lab booking.
That handover creates a debt with a fixed due date. If your enclosure does not have the right flame rating, your product will not reach the market. If your power supply leaks too much current, no amount of clever firmware will save it.
You need to own your regulatory requirements with the same energy you give to your product’s selling points. They are not someone else’s job.
The cost of a late fix is brutal
Here is what this looks like in practice. A creepage violation — creepage being the distance a current would have to travel across a surface between two conductive parts — costs you an afternoon if you catch it in CAD.
Catch that same violation during IEC 61010-1 testing and you are looking at a new board layout, new components, and a second full test campaign. That bill can easily pass what you spent developing the product in the first place.
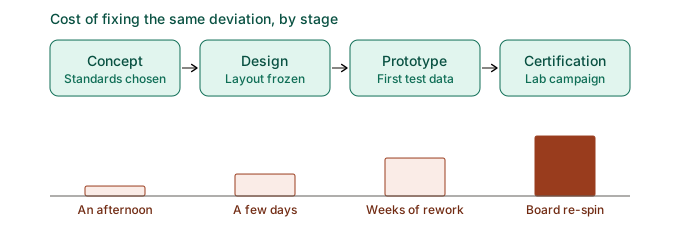
Late fixes also refuse to stay small. One dimensional change moves a connector, which moves the wiring harness, which changes how your product radiates — and suddenly you are back at the EMC lab with a product you thought was finished.
There is a harder lesson underneath all this. Some products pass every single test and still fail once they reach real users. I wrote about that gap in why products pass tests but still fail, and it is the best reason to design against real hazards rather than against clause numbers.
Which Standards Should You Lock In Before the First Schematic?
Choosing your standards is a design decision, not paperwork. Do it before layout, because those standards decide your insulation distances, your materials, and the conditions your product will be tested under.
Think of it as drawing the boundaries of the playing field. Once your team knows where the lines are, nobody wastes a month on a design that was never going to be legal.
Map the regulatory landscape for every market you want to sell into, and start with these four questions:
- Which product family standard applies? IEC 61010-1 covers laboratory and industrial equipment, IEC 60601-1 covers medical devices, and IEC 62368-1 covers audio, video, and IT equipment.
- Which directives apply in your target region? For the EU, that means the Low Voltage Directive and the EMC Directive 2014/30/EU. For Great Britain, you follow the equivalent UKCA route.
- How will you reach other markets? The CB Scheme lets you reuse one test campaign across most major countries instead of paying for the same tests repeatedly.
- What about materials and end of life? RoHS, REACH, and WEEE shape which components you are allowed to use, so they belong in this conversation, not in a later one.
Answer these four at concept stage and every design choice you make afterwards has a solid reason behind it.
Watch out for standards that are changing
Standards move under your feet, and this catches out experienced teams as often as new ones. IEC 61010-1 Amendment 2 changes several requirements that affect your design margins, and I broke down what actually matters in the Amendment 2 guide.
Machinery is shifting too. prEN 50742 is redefining machine compliance, and anything designed around the old assumptions will need reworking.
If North America is on your list, bring UL and CSA requirements in early, then look at CB Scheme alignment so you can stretch one test campaign across several markets. The IECEE CB Scheme overview explains how the member scheme works.
One thing newcomers consistently underestimate is how different national rules really are. Regulatory divergence explains why a CE-marked design does not automatically walk into Korea, Japan, or Brazil.
How Early Should Risk Analysis Drive Design Decisions?
In a lot of companies, risk analysis is a stack of forms someone fills in after the design is frozen. That is not managing risk. That is writing down how exposed you already are.
A risk file only pays for itself when it changes something real: a component, a barrier, a clearance, a warning label. If nothing in your design moved because of the analysis, you did not do an analysis.
So run it early, run it seriously, and run it again every time the design changes.
Turn the analysis into a design tool
I explained how to make this shift in risk analysis from formality to strategy, and the full method lives in the product risk analysis hub.
Structured methods keep you honest as the project moves, so build these four habits into your reviews:
- Run an FMEA at concept stage. Failure Mode and Effects Analysis catches showstopper risks while the architecture is still easy to change. Effective FMEA implementation shows how to keep it from turning into a spreadsheet nobody reads.
- List every energy source in the product. Electrical, thermal, mechanical, and chemical. Each one needs a safeguard you can point to.
- Redo the assessment after every change. Swapping one component can quietly cancel a safeguard you documented three months ago.
- Assume users will get it wrong. People misuse products in predictable ways, and misuse is normal shows you how to design around that.
Do it this way and your risk file stops being a document you defend. It becomes the map that walks your auditor straight to the answers.
Do not trust your own judgement completely
Here is something worth knowing early in your career. Teams reliably underrate the risks they have lived with for months, simply because familiarity makes danger feel normal.
How bias impacts risk management explains why this happens and how to counter it. If you want somewhere concrete to start, the free risk analysis tool helps you track hazards and mitigations as the project moves.
Why Do Component Choices Cause So Many Late Failures?
I regularly see a beautifully engineered circuit held up by a two-dollar power adapter or a terminal block with no safety markings on it. When a part carries no approval, the job of proving it is safe lands entirely on you.
An uncertified component might look like a bargain on the bill of materials. The hidden cost arrives later, and it is much bigger than the money you saved.
What actually happens at the lab
When a certification body finds an unapproved critical component, it will not simply accept it. It tests that part on its own, which adds weeks to your schedule and a serious line item to your invoice.
If the part then fails something like a glow-wire test — a check of whether a material catches fire when a hot wire touches it — you are back to sourcing a replacement. That replacement may have a different footprint, which means another board revision.
Build a bill of materials that is ready for certification
A firm component policy protects your certification and your supply chain at the same time. Put these four rules in place:
- Ask for the paperwork before you commit. A Certificate of Compliance or a UL Yellow Card for power supplies, relays, transformers, and plastics.
- Read the scope, not just the logo. A part approved for industrial use may not be acceptable inside a medical device.
- Standardise your flame ratings. UL 94 V-0 or V-1 enclosure materials make the fire enclosure requirements of most safety standards much easier to satisfy.
- Keep an approved vendor list. Buy from manufacturers who will tell you when they change something.
If a supplier cannot hand you a test report, find one who can. The few cents you save are never worth the risk.
The detail behind all of this sits in the importance of component selection, including how to plan for interchangeable parts before something goes obsolete on you.
Thermal ratings deserve special attention. The derating decisions you make at schematic stage decide whether you pass temperature limit requirements months later.
What Can You Test Yourself Before Booking a Certification Lab?
Your calculations describe an ideal product. Real cables, real enclosures, and real switching edges will disagree with them, often loudly.
Waiting until the end to visit an EMC lab is like waiting until your wedding day to find out whether the suit fits. Pre-compliance testing means finding the disagreement while it is still cheap to fix.
The goal is to fail fast and fail privately. A failure in your own lab in month three is useful information. The same failure at a third-party lab in month twelve is a crisis with an audience.
Start with what you can do on your own bench
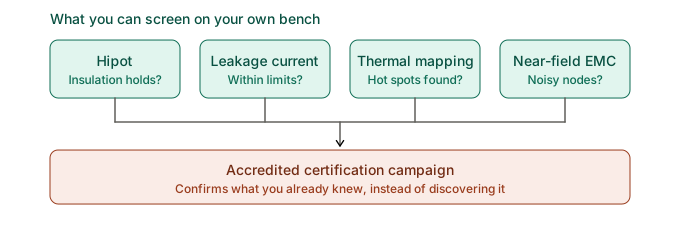
You need less equipment than you probably think. These four checks catch most of the common problems:
- Dielectric strength, or hipot. A benchtop hipot tester pushes a high voltage across your insulation to see whether it holds. Why hipot testing is crucial covers the theory, and designing for hipot covers what it means for your design.
- Leakage current. Measure it early, because the fixes tend to be structural rather than cosmetic. Design mitigation strategies covers what genuinely works.
- Thermal mapping. Where you place your thermocouples decides whether your result means anything. Start with the thermocouple placement guide and surface temperature control.
- Near-field EMC probing. A simple probe and a spectrum analyser will tell you whether your switching power supply is going to be a problem, while you can still change the layout.
None of this replaces accredited testing. What it does is remove whole categories of nasty surprise from your formal campaign.
Test often, retest after every iteration, and do not be afraid of a failure. A failed test is just a very clear instruction about what to improve next, and it is far better to receive that instruction in your own lab than from the market.
Get the EMC basics right first
Most emissions failures trace back to a short list of recurring mistakes. Top 10 EMC mistakes lists them, and ground plane versus earth reference clears up the confusion behind a lot of them.
If conducted emissions are your weak spot, EMC filter design walks through component choice and placement. Getting the filter right on the schematic costs far less than gluing ferrites onto cables at the lab.
Protective earthing sits right where safety and EMC meet, and it is easy to solve one while breaking the other. Protective earth systems shows how to satisfy both.
How Do You Build a Technical File an Auditor Will Trust?
If your product passed a test and nothing records that it passed, then as far as a regulator is concerned, it did not pass. Poor documentation is still one of the most common reasons certifications get delayed.
Remember that an auditor is judging your process as much as your product. A file full of mismatched revisions and undated spreadsheets suggests a design process with exactly the same level of discipline.
Tell one clear, traceable story
Your file should read as a logical sequence: what the product is for, what could go wrong, what you designed to prevent it, and what the test results proved. Four habits will get you there:
- Control your revisions strictly. Every schematic, bill of materials, and manual in the file must match the version you actually certified.
- Draw the isolation boundary clearly. A block diagram showing where hazardous voltage stops and user-accessible parts begin answers half your auditor’s questions before they ask.
- Write down your reasoning for any deviation. Where you depart from a non-mandatory part of a standard, explain in technical terms why your approach is equally safe.
- Keep one source of truth. A managed repository stops three versions of the same drawing circulating between teams.
Document your failures as well as your successes. Showing the root cause and the fix proves you understand your product; saying nothing suggests you never looked.
Every design has flaws. The difference between a good product and a mediocre one is how much effort went into finding and fixing them.
Your file now covers software too
If your product connects to anything, software has become part of your compliance story. SBOM for product compliance explains what a software bill of materials is and why regulators want one, and the Cyber Resilience Act hub covers how these duties land on connected products.
Labelling belongs in the file as well. Warning labels in product compliance covers the symbols and wording that market surveillance authorities check first, because labels are the easiest thing for them to inspect.
One last point that surprises people. The technical file is a legal record, and in most EU jurisdictions you must keep it for ten years after the last unit is sold.
When Should You Bring In a Certification Body?
Manufacturers often treat the test lab as the opposition. That instinct is expensive. Most labs offer pre-evaluation or gap analysis, where one of their engineers reviews your concept before you commit money to tooling.
A one-hour conversation at schematic stage routinely saves weeks of rework. These engineers see thousands of products a year and know exactly where designs like yours tend to fail.
Use the relationship on purpose
Early engagement changes your position from waiting for a verdict to shaping the outcome. Four ways to do that:
- Invite a compliance engineer to an early design gate. Your grounding strategy and component choices benefit most from an outside pair of eyes.
- Ask for an interpretation when a clause is unclear. Standards are written by committees and some clauses really are ambiguous. Guessing conservatively costs money.
- Ask about measurement uncertainty. It eats into your design margin, and why EMC measurement uncertainty is so high explains how much headroom you actually need to leave.
- Book lab time well ahead. Everyone rushes at the end of the quarter, and queues at the big test houses stretch into months.
Booking early also gives you a fixed date to design towards, which has a useful way of sharpening everyone’s internal milestones.
What Does a Designing for Compliance Checklist Look Like?
Use this at each project gate. It condenses everything above into decisions that need an owner and a date.
Phase 1 — Concept
- List your target markets and the marks each one requires: CE, UKCA, UL, CCC, KC.
- Identify your product family standard and confirm you have the current edition.
- Put certification fees and external lab time in the budget now, not later.
Phase 2 — Design and development
- Complete a hazard-based risk assessment before you finalise the PCB layout.
- Choose components that already carry UL, ENEC, or CSA approval.
- Check creepage and clearance on the 3D model, not on the finished prototype.
- Apply design-for-EMC basics: ground planes, filtering, shielding.
Phase 3 — Prototyping
- Run your own hipot, ground bond, leakage, and thermal checks.
- Take an engineering model to an EMC lab and find your frequency peaks.
- Write down every failure and what you did about it.
Phase 4 — Certification
- Assemble the technical file: manuals, bill of materials, schematics, risk analysis, test reports.
- Check that your label carries every required symbol and warning.
- Submit the golden sample.
Phase 5 — Post-market
- Set up a way to track field failures and safety complaints.
- Watch for changes to the standards and directives behind your certificate.
- Plan for repair duties under the Right to Repair Directive 2024/1799 and data duties under the Digital Product Passport.
That last phase is where compliance programmes quietly fall apart, because everyone has moved on to the next project. Market surveillance shows you what authorities look for, and product recall shows what it costs when they find something
Conclusion
Deviations are cheapest to fix where they are created, which is at design, not at test. Risk analysis, component selection, and early in-house testing are what most change your certification outcome. A file you build as you go costs less than one assembled under deadline.
Standards will keep moving, so make watching them part of your process rather than a scramble before your next launch.